Sunday, April 19, 2020

Sewing a Theorem Painted Reticule


A couple months back, the Stephenson House offered a two-day workshop on painting velvet theorems then turning them into period-style reticules. I'd wanted to learn this stenciling technique for several years. House volunteer and local artist, Janice Camren taught the theorem portion of the workshop while I instructed the sewing of a period-style reticule.

I looked through several museum inventories for inspiration on what type of reticule would typically feature a theorem painting. There was a wide range of shapes and styles. Ultimately, I settled on what I hoped would be a simple bag construction since the workshop participants had varying levels of sewing skills, plus we wanted to be able to complete (or come close) the reticule in an afternoon.


This technique was very easy to learn. Supplies included a piece of 12x12 velvet, oil paints, stencil brushes, matt board, painters tape, stencils, paint knife, and paper towels.
Oil paint sticks made a lot less mess than traditional oil paints and dried very quickly.


One of the paintings completed during the first day of the workshop. Participants picked from four different stencil designs; birds, fruit, flowers, and moths. 

Each painting was completely unique.

The workshop participants, minus me, showing off their lovely theorems.

Once the theorems were dry the sewing could begin. As mentioned above, I decided a simple bag reticule would be the easiest for everyone to sew and very period-appropriate. Supplies needed to complete this project include:

  • 2 - 12 x 12 velvet pieces (one with the painting on it and one for the back)
  • 1 - 13.5” (long)  x 12” (wide) piece of silk cut on a fold (making it 27" long x 12" wide)
  • thread (either matching the silk or in a complementary color)
  • sewing machine (optional)
  • fabric scissors
  • long sewing ruler
  • disappearing fabric marker
  • pins
  • iron and ironing board
  • ribbon for drawcord and something to pull it through casings


Step 1. Place the velvet back and front pieces right sides together. Pin the sides and bottoms together. Sew ½” seam around sides and bottom edges. Leave top edge unsewn. If you have a design on the front panel, be sure it is in the correct location before sewing.

Trim seam allowance to 3/8”, clip corners, and press seam open. A sewing ham will make this easier but is not necessary.

Turn velvet bag right-side out.

Front and back velvet piece pinned together.  Leave the top section open.

Trim the side and bottom seams to 3/8".


Trim the corners.


Press the seams open.


Turn the bag right sides out.


Step 2. Fold the silk lining piece in half (right-sides together) and pin the sides. The bottom of the bag is cut on the fold so it will not need to be sewn. Leave the top of the bag open. Sew a ½” seam down both sides of the bag between the marks. A 1 1/4” section at the top of both sides will be left unsewn, as well as, a 2” section on one of the sides (to be used to turn the bag right-side-out in a later step). Press seams open.

NOTE: If this piece was laid out flat it would measure 27" (long) x 12" wide. When the piece is folded in half it measures 13.5" (long) x 12" (wide). The silk lining is longer then the velvet outer bag. 

Sides are pinned and ready to sew. The bottom is on the fold. Leave a 1 1/4" section unsewn on both top sections as well as a 2" section on one side close to the bottom of the bag. 

Step 3. Press the unsewn sections open too. The photo below shows one of the 1 ¼” sections at the top. A portion of this open section will become the opening for the drawcords later. In Step 5, they will need to be butted up against each other (as if they were sewn) and pinned down.


1 1/4" opening at top edge. There should be two; one on each side of the top.


Step 4. Tassels can now be added to the corners on the outer velvet bag. You can either make your own (like I did) or purchase readymade. Thread one of the long top threads into a needle with a larger eye. Run the thread through the corner of the velvet bag to the inside. Do the same with the other top thread. Tie to the two threads together on the inside of the velvet bag. Repeat with the second tassel and corner.


Tassels I made but store-bought would work just as well.


Thread one of the tassel's top threads through a large eye needle and run it through the corner of the bag to the inside.


Thread the second top tassel through the corner to the inside of the bag.


Tie the two threads together on the inside of the bag.


Finished tassel. Now repeat with the other side.


Step 5. Now take the velvet bag (right-side-out) and slid it into the silk lining bag (the wrong side out)…the bags will be right-sides together. Match the top edges and side seams then pin in place. Sew a 3/8” seam all around the top.

Reminder: the top 1 ¼” of the silk bag sides were not sewn but left open. When you pressed the side seam open in Step 3 it mimicked the fold of the sewn seam. Be sure to fold this portion of the seam back (mimicking the sewn side seam) then butt the two edges together when pinning the tops and sew over them when stitching the top edges together..  


Step 6. Once the top edge is sewn all the way around, pull the velvet bag out of the silk lining. It should look like the image below. Wrong sides are out. Press the top edges (you just stitched) toward the velvet bag section.


Step 7. Time to turn the bags right-side out. Using the 2” unsewn side seam, turn the bags. Once turned you can slip-stitch the 2” hole closed.


2" opening at the bottom is now sewn closed.

Step 8. Now comes the tricky part. The lining bag is longer than the velvet bag. It was done this way so you will have a pretty silk top on the reticule once it’s finished.

Insert the silk lining into the velvet bag, matching up the inside corners. The easiest way to do this is to start sliding the silk inside while placing your index finger in the corner of the lining. Keep your index finger in the silk corner and match it to the velvet corner. Pull gently on the silk lining with your other hand to remove any bunching on the inside. Pin the corner on the outside of the bag (catching all the layers). See the photo below. Repeat with the other corner. Slide your finger along the lining bottom, being sure that the lining is touching the bottom of the velvet section, pin it in place too. Also, be sure to match up the side seams. All of this may take some finessing, but you want to be sure the lining is smooth on the inside with about 1 ½”-2” (depending on the length of your lining silk) protruding out the top of the bag. Everything should be laying smooth. If it’s not smooth, then unpin it and reposition everything.

Once smooth and you’re happy with it, pin the velvet and lining (only two layers per side…not all four together) together all the way around the bag about 1” below the top seam (see second photo below).  Pin the silk top too. All layers must continue to lay smooth with no twisting or bunching.


Pins are holding the bottom lining and outer bag together securely.
This is how the top of the bags should look once they're smoothed and pinned together. 


Step 9. Check that the interior seam, where the silk and velvet join, (Step 6) is still laying pressed toward the velvet body. If it’s not, then manipulate it through the layers with your fingers back into position and pin it in place. Once this seam is pinned, remove the pins placed below the seam (in the previous step) since they were only there to keep everything smooth up to this point.


Step 10. Sew a spaced running stitch through the lining in the ‘ditch’ of the seam. Try not to catch the velvet portion. This stitching will not be visible from the outside. It will also hold the velvet/silk seam toward the body (you don’t want it slipping upward). This will create the bottom seam for the drawcord channel.


Step 11. On the inside of the top silk section, mark a 1/2 “ line from the top edge. Go all the way around the top edge.  This measurement should match up with the side seam openings from Step 5. Use a running stitch to create the top seam for the drawcord channel.


Step 12. Insert your drawcords. I used two ribbons, the same length, for this. Since reticules were not usually worn slung over the shoulder, keep the ribbons short enough that if you held them in your hand the bag would not touch the floor.

Starting at one drawcord opening, run one length of ribbon all the way around the drawcord channel then out the same hole you started at. Tie the ribbon to its end. Repeat with the other opening.

And you're done! 


Friday, January 17, 2020

A Circular Reticule Tutorial

Fashion plate dated 1801 showing a circular reticle.
I am fascinated by the lovely reticules Federal-era ladies carried with them. A reticule was a small bag that easily held items the owner may need throughout her day. They came in a wide variety of sizes and designs. One of my favorite shapes is what is called the 'circular' reticule. Most of the original ones I've seen are rather petite like the one in the fashion plate at left.

After finding very little on the internet by way of tutorials, I decided to put my own together. There are a couple different ways to create this style of reticule.  The one I will show here seems to be the most straight-forward.  If you'd like to try your hand at a second method, read pages 262-263 of "American Girl's Book: Or Occupation for Play Hours" by Eliza Leslie published in 1831. Google has a free online copy available here.

Let's get started!

The two paper pattern pieces I drafted to make cutting my fabric easier. The top circular piece will be used for the fabric and cardboard pieces of the side medallions. And the long piece for the body of the reticule.


Cut a piece of silk 7" wide by 27" long for the body of the reticule. It can be cut wider and longer, it's really up to you but I wouldn't make it any smaller. On both long sides fold the edge in about 1/4" and press.

One long side folded in and pressed. Do the same on the other long side.


Fold the short edges in 1/4" then again 1/2" to create a channel on both ends. Whipstitch these edges down. In the last step, a ribbon will be added to the channels to enable the reticule to open and close.


Short edge folded over 1/4" plus 1/2" and pinned in place. The lower edge can now be whipstitched down. This creates the channel used to close the reticule with the ribbon in the final step.


All the body's edges are prepped and ready to be sewn.


This photo shows the whipstitching on a short edge. Be sure to leave the ends of the channel open.


Now, I could have done this next step before sewing the channels (above) but I didn't. Hindsight is 20/20. In the photo below it's obvious that a small section, below the channel (about 1") on both sides, was folded in and pinned. This was done on both ends of the body piece. This area of the body is not sewn to a center medallion (later step) so the cut edges needed finishing to keep them from fraying during use.


The area below the channel (about 1" on each side) was folded under and whipstitched down. This will prevent the cut edge from fraying. 


A small running stitch is used along both long sides. Start and end the running stitch below the 1" sections sewn in the previous step. I doubled my thread to make it extra strong since I used regular cotton thread. This thread will be pulled in a later step to gather the body to a medallion. Do not gather it yet.


The small running stitch on one long side of the body. Repeat this on the other long side.

Creating the medallions is the next step. First, cut out four 3" wide circles from some type of sturdy cardboard. I used mat board, the type used in framing. Another source would be the back of an inexpensive sketchbook (like you can buy at Walmart or Michaels). Just use something sturdy that doesn't bend easily (preferably no box cardboard). The medallion can be larger or smaller than 3" but be sure that it's diameter is roughly 1/3 the size of the overall finished reticule. 


Pictured here are four cardboard disks (aka medallions) cut from sturdy mat board. The large square is leftover mat board. The paper pattern shows the 3" circle of the medallion and the additional 1" needed when cutting out the fabric to cover each medallion.

Close-up of the paper pattern and one mat board disk.


The thickness of the mat board.


Many extant circulareticules have decorative stitching or details sewn to the center medallions. Embroidered initials, painted paper, theorems or spangles are common choices during the Federal/Regency period.  Below are three extant reticules with medallion detail. Of course, it's not a requirement for the medallions to be decorated. This reticule style is lovely with or without details. 


Early 19th Century Silk, Satin, and Paper Drawstring Bag - Museum of Fine Arts Boston


Reticule. Worn by Mehetable Stoddard Sumner (Welles), Made in France but used in American, 1784-1826. Museum of Fine Arts Boston


Embroidered Silk and Watercolor on Paper "Memento Mori" Reticule, America, first-quarter 19th century. Sold by Skinner Auctioneers and Appraisers.

A total of four silk fabric circles will be needed to cover the medallions in the next few steps. I chose to use some embroidered silk leftover from a previous project to cover the outer medallions of my reticule. The interior medallions are covered with the same silk as the body since they will not be visible. The silk for the medallions should be cut at least 1" larger than the cardboard circle piece (see paper pattern piece pictured above). The paper pattern in the photo below shows the 3" circle (cardboard piece, center) and the 1" allowance surrounding it.


The pattern piece on the left shows the 3" center circle (to be used to cut out the cardboard needed for the medallions) and the larger outer circle (to be used to cut out the silk to cover the cardboard pieces). The silk on the right will be used to cover the outer medallions of the reticule.


All four silk circles have been cut and are ready to cover the cardboard circles. Since the interior medallions will not be visible, I chose to use the same fabric as the body. 


The embroidered silk for the outer medallions was really thin and delicate. I added light-weight linen as a backing to give it some support and durability. If your silk is strong enough, this lining is not necessary. Here the two layers are pinned together.


Sew a running stitch  1/2" in from the edge of the silk circle. I used a doubled thread with a large knot in the end. The knot needs to be large enough to keep the thread from slipping in the next step. Here the linen lining of the outer medallion silk is visible. 


Place one of the cardboard circles on the wrong side of a silk circle. Be sure the running stitches extend beyond the edge of the cardboard piece and the cardboard is in the center.


Pull the thread so the fabric gathers around the cardboard. Pull it snug. To secure the back, crisscross the thread over the back piece several times catching the cut edges (see next picture for a closeup of this) then tie off the thread.


Detail of the criss-cross thread on the back of the medallion.  This step is very similar to the technique used to cover buttons. The stitching doesn't have to be pretty since it won't be seen.


Once all four medallions have been covered with silk it's time to start attaching them to the body. The easiest way to do this is to section off each medallion and the body into quarters starting below the 1" section sewn below the ribbon channel in a previous step. Use a disappearing fabric marker for this. Make the marks on the backside of the fabric so they are not visible on the finished side. Match-up the quarters on the body to those on one medallion. Below I've pinned the pieces (body and one medallion) together at the quarter marks.


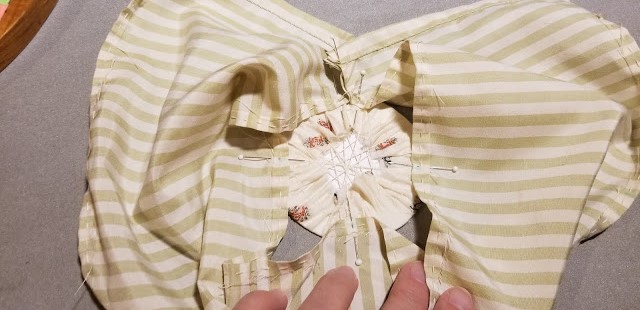
The body is pinned to an outside medallion at the quarter marks. Keep the 1" section of the body (below the ribbon channels) free from the medallions. When pinning the reticule body to the medallion, be sure the cut edge of the body (that has been folded and a gathering stitched sewn through it) sits in from the edge of the medallion.

Start pulling the gathering stitch (on the body) to fit each quarter section together. Gently adjust the gathers to be evenly distributed. Pin in place as you go.


All quarters have been gathered and pinned in place. Note the 1" sections that have not been pinned to the medallion at the top of the photo.


The pinned reticule from the right side. It is now ready to sew the first medallion in place.


Use a small slip-stitch to attach the gathered body to the silk-covered medallion. Try to catch only the edge of the silk on the cardboard piece, this will help hide your stitches. Be sure to use small stitches spaced close together for a strong seam. Continue all the way around the medallion.


Another shot of the stitches attaching the body to the medallion.


The first medallion is now completely sewn to the body.


The right side of the reticule after the first medallion is complete.

You will repeat the above steps to attach the other outer medallion to the body. Once the second outer medallion is attached then the reticule can be turned inside out and the interior medallions sewed down. Attaching the interior medallions are fairly simple to complete. Just lay one medallion on top of all the interior stitches (one on each side) and attach using a small slip stitch.


One interior medallion is sewn in place in the same way at the outer medallions.


The 1" sections that were not sewn to the medallions can either be left open or sewn together closing the 1" gap. I chose to sew the gap closed. Unfortunately, I did not get a photo of this step. Place the two outside folded edges together and sew a small whipstitch over the edges. 

The last step is to run your ribbon through the channels. You will need two ribbons the same length (however long you want your ribbon straps to be). Starting on one side, run your ribbon through the channel using a long needle-shaped bodkin. Once through the first channel, bring it around through the other channel and tie it off. Repeat this on the opposite side. You will have two ribbons that when pulled will close the reticule.