
Wallpaper boxes would have made excellent, as well as decorative storage containers in the early 19th century. Over the years, I have taught this project many times to children attending summer camps at the 1820 Col. Benjamin Stephenson House. It's an easy project to make on a small or large scale. You're only limited by the size of your wallpaper pieces. The photo above shows two small boxes made during Mrs. Lucy's Academy for Young Ladies in 2018. The larger box below was constructed several years ago for display in the master bedroom at the historic home.

 |
| Made from reproduction early 19th-century wallpaper and lined in photocopies of an 1819 Edwardsville newspaper. It's large enough to store a man's top hat inside. |
Supplies:
·
Wallpaper sample books
·
Small cardboard boxes (available at Michaels,
JoAnn Fabrics, Hobby Lobby)
·
Pencil
·
Ruler
·
Flour Paste (recipe at end of the post)
·
Small paint brushes
·
Scissors
·
Paper towels
 |
| A simple cardboard box and wallpaper samples. |
Step 1. Choose the sheet of wallpaper you
will be using. Pick a pattern that works well with the shape of your box. Think
about how the wallpaper design can be used to highlight the box shape (e.g.
trim around lid, center design on the lid, the body of the box). Be sure that there is
enough of the sheet to completely cover your box. If necessary, pick another
sheet to compliment the first one.
Step 2. On the wrong side of your wallpaper
lay the box on its side with the bottom edge lined up with the straight
edge of the paper. Take a pencil and mark the top edge of the box on the paper. It's hard to see in the photo below but there is a pencil line directly below the right edge of the box.
You will also want to get an idea of how long of a strip you will need for the
body. An easy way to do this is while your box is still in this position, mark the side edge of the paper on the box then roll the box until the mark comes
back in contact with the paper. You’ll want to have at least ¼” overlap of paper for the
side seam.
 |
 |
| The pencil mark on the paper shows the top edge of the box. |
Step 3. Take your ruler and measure the distance from the bottom edge of the wallpaper to the pencil mark indicating the top edge of your box. Use this measurement to mark the width of your box the entire length of your wallpaper sheet then draw a straight line connecting your marks on the top edge.
 |
| This image shows the width from the bottom edge to the top edge with 1/2" overlap at the top. The 1/2" overlap will be cut and folded in Step 4-6. |
 |
| Box body wallpaper piece cut out. |
Step 4.
On the top edge make cuts into the ½” allowance stopping about 2/16”
from the top edge pencil line. Try not to cut all the way to the pencil line.
This edge will roll over the top of your box edge to the inside. By leaving 2/16” uncut,
you’ll have a nice smooth edge on the top of your box body.

Step 5. Coat your box body piece evenly with
flour paste. Be sure to cover the entire piece.

Step 6. Lining
up the bottom edges of the box and paper, slowly work the paper around the body
of the box. There should be at least a ¼” seam overlap on the side of the box.
Once the body is on, start folding over the top edges ½” allowance. If your
glue has started to dry out just add a little more. To ensure the paper adheres
to the box, gently work it with your fingers. If edges are not adhering, add a
little more glue. Set the body aside to dry.
 |
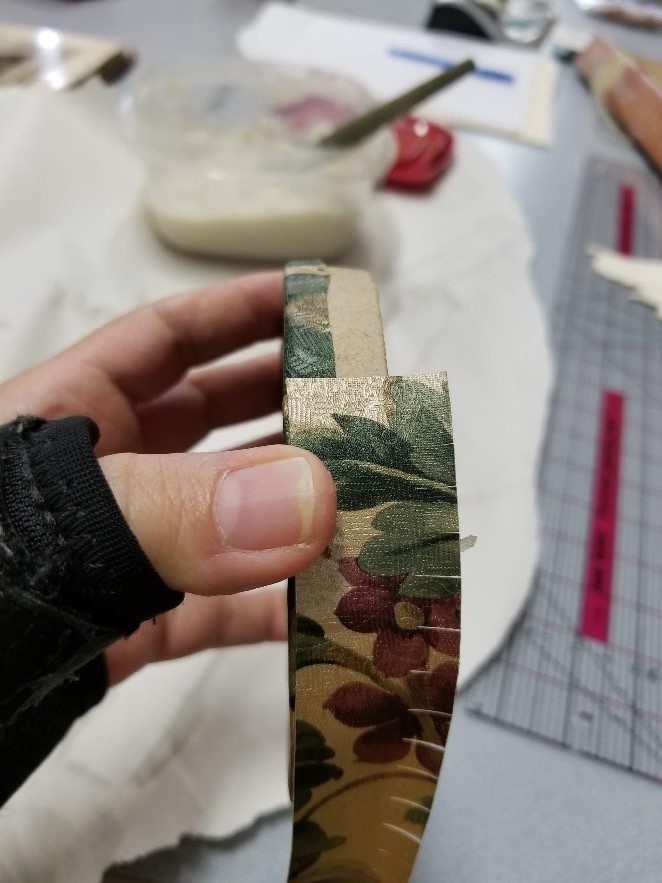
| Here you can see the overlap of wallpaper along the side seam. |
 |
| The top edge is coated with paste and being smoothed over to the inside of the box. |
 |
| The top edge is now completely adhered to the inside of the box. |
Step 7. Place your lid, on the wrong side
of the wallpaper piece, on its side. Match the bottom or top edge of the lid
to the straight edge of the wallpaper. Mark the side width of the lid on the
wallpaper with a pencil. You will also want to get an idea of how long of a
strip you will need for the side of the lid. An easy way to do this is while
your lid is still in this position, mark the side edge of the paper on the box
then roll the box until the mark comes back in contact with the paper. You’ll
want to have at least ¼” overlap for the side seam.

 |
| Pencil mark indicating the top of the lid is rather hard to see in this photo. |
Now measure ½” from your straight
line to create the cut line. This is the same as you did when measuring the body
piece.
 |
| Add 1/2" to the width of the lid. |
Step 9. In the ½” allowance, make cuts in
the wallpaper stopping about 2/16” from the pencil line. Try not to cut all the
way to the pencil line. This edge will roll over the bottom of the lid to the
inside. By leaving 2/16” uncut, you’ll have a nice smooth edge on the bottom of
your lid.
Set this
piece aside for now. It will be added last.
 |
Step 10.
Place the lid topside down on to the wrong side of the wallpaper. Draw a
circle around the lid. Add ¼” -½” to this line all the way around. I would
recommend the ½” since it will give you a little more to work with but if you
don’t have enough wallpaper (as seen here) then a ¼” will do if you’re careful.
 |
 |
Step 11. As with the box body, make small
cuts all the way around the pieces ½” allowance. Be sure not to cut all the way
to the line. Leave 2/16” uncut for a smooth finished edge. Once you’ve created
all the cuts then brush on the flour paste.
 |
 |
 |
 |
 |
Step 13. Coat your lid side piece evenly with
flour paste. Be sure to cover the entire piece. Lining up the bottom
edges of the lid and paper, slowly work the paper around the side of the lib.
There should be at least a ¼” seam overlap on the side of the box. Once the side
piece is on, start folding over the bottom edge’s ½” allowance. If your glue
has started to dry out just add a little more. To ensure the paper adheres to
the box, gently work it with your hands. If edges are not adhering, add a
little more glue.
 |
 |
Side Note: In the event, you measured the length
of the lid side wrong (like I did), you can easily add a piece to fill it in.
Just cut it the same width as the lid side piece and 1/2” longer so you have a
small overlap on each side.
 |
| I didn't measure correctly so the edge piece was too small. |
 |
| The problem solved by adding a patch. The pattern of the wallpaper is busy enough to be unnoticeable. |

Bookbinding Paste (historical recipe)
Use 1 part four (not self-rising) to 5 parts water. Heat just to simmer, stirring constantly (use a whisk like you're making a cream sauce). Add more water if necessary to get a thick cream/thin pudding consistency. DO NOT BOIL!! Cook until transparent. This paste will have a very strong bond.

