It's finally time to work on the sleeves for my mourning dress. I wanted something a little fancier than I usually wear. Typically, I don't like short, puffed sleeves on my dresses (for a variety of reasons) but several period images kept catching my eye. All of the sleeves had a short, puffy top sleeve with a sheer lower sleeve. My dress is very simple but sleeves like these will offer some visual interest and period style for a very somber dress. Below are the inspiration images
 |
| The Duchess of Kent and Princess Victoria by Sir William Beechey, c. 1821 |
As mentioned in previous posts, the pattern used as a base for my dress is
Laughing Moon #126 Ladies Round and Trained Gown with High Stomacher Front, c. 1800-1810 with modifications made to the bib. The sleeves in LM #126 were not quite the shape or style I was looking to recreate but they weren't too far off. Last year I had made a ball gown for the Stephenson House that incorporated the sheer poofed sleeve from
Laughing Moon #138 Ladies Regency Gown, c. 1815-1825. The #138 sleeve was beautiful and exactly what my dress needed to take it into the 1820s. I decided the original sleeve pattern would be combined with #138. The sleeve from #126 incorporated the following from #138; it was shortened, slits were added, and poofs cut.
 |
| The original sleeve from #126 was shortened to resemble the sleeve from pattern #138. |
 |
| The sleeve's interfacing of wool crepe is marked for slits and pinned to the right side of the sleeve. |
 |
| Using the sewing machine, I sewed around the outside of the slit markings on both sleeves. |
 |
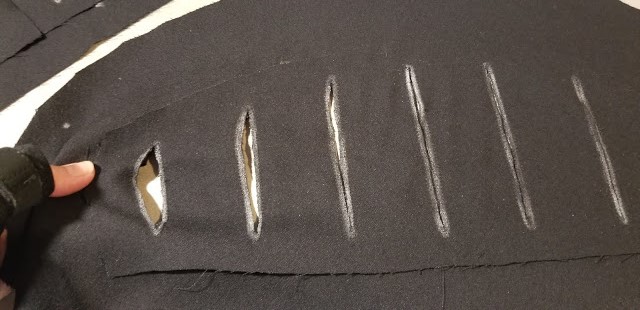
| Once all the slits were sewn the centers were cut open with a pair of sharp, pointed scissors. |
 |
| The wool crepe interfacing was cut between each slit so it could be turned to the inside of the sleeve. |
 |
| The bottom sleeve in the photo shows the interfacing turned to the inside and pressed. |
 |
| Close-up of the right side of the sleeve once the interfacing was turned to the inside and pressed. |
 |
| Close-up of the inside of the sleeve after the interacting was turned and pressed. |
 |
| This is one of the silk 'poofs' that will be sewn into the sleeve slits. There were 14 in total. Unfortunately, I did not get a photo of the 'poof' before the gathering stitches were put in. This is how it looks after the gathering stitches were pulled to create the fullness. The instructions in LM #138 do a great job explaining how to attach each piece so I won't go into detail. |
 |
| It so hard to see what's going on here because of the black on black. Just below my thumb is the silk 'poof'. I'm sewing the gathered poof into the slit with a spaced-backstitch all around the edge of the slit. |
 |
| Three of the fourteen 'poofs' are attached. |
 |
| One sleeve with all the 'poofs' sewn in. |
 |
| How the sleeve looks from the inside once all the 'poofs' were attached. |
 |
| Because of the weight of the sleeve, I decided to add a partial lining at this point. It's the same polished cotton used to the line the bodice. |
I have no photos of the sleeve being attached to the bodice. None of them really turned out. The black on black made distinguishing what was going on to difficult. Since I had chosen to just modify the original #126 sleeve while keeping the basic shape, all of the pattern placement instructions provided by Laughing Moon would be the same.
For the lower sleeve, I wanted something more fitted than the pattern piece from LM. This sleeve piece would be made out of
sheer silk chiffon I found at Fashion Fabrics Club in St. Louis for $15.95 a yard. It was perfect for my lower sleeves and a new neckerchief. This is also the fabric used to make the 'poofs' in the upper sleeve.
 |
| Obviously not sheer silk. I did a couple mock-ups of the lower sleeve in order to get the fit I wanted. The sleeve is very long in this photo but after it is hemmed and a wrist band added, it will be the perfect length. |
 |
| Getting ready to cut the silk. The fitted pattern was cut on the bias to give the sleeve more movement and stretch when I wear it. |
 |
| Now, if I had been smart I would have sewn a french seam on the lower sleeve instead of the flat -felled seam but hindsight is 20/20. It didn't even occur to me until I'd already sewn in the flat-felled seam that the french seam would have been so much easier (and probably prettier). A rolled hem would be used to finish the wrist edge (not done yet in this photo). At the top, I folded over the edge 1/4" plus another 1/4" and back-stitched it (not done yet in this photo). |
 |
| Flat-felled seam ready for sewing. Isn't this fabric gorgeous? |
 |
| Here the lower sleeve is being attached to the upper sleeve. This view shows both sleeves inside out. The lower sleeve is being whip-stitched to the top of the upper sleeves armband. |
 |
| The lower sleeve attached to the upper sleeve. All that's left is to create a wristband. |
 |
| The wristband was cut from the wool crepe the circumference of my wrist plus 1/2" for seam allowance and 1/2" for overlap to close it. The width was roughly 1 1/2". All sides were folded in 1/4" and pressed (the upper piece in photo). Then the band was folded in half lengthwise (the lower piece in photo), pressed, pinned, and all edges were whip-stitched closed. |
 |
| A hook was added to one side of the band and a thread bar to the other. This would enable me to close the band around my wrist. |
 |
| One short edge of the band was attached to the seam of the lower sleeve about 2" from the wrist edge. The band would hang free of the lower sleeve with the exception of the one short edge sewn to the lower sleeve seam. |
THE COMPLETED GOWN!
I have to say I'm VERY pleased with the final gown. This is the fanciest gown in my wardrobe. Usually, my interpretation is of a working-class woman not a fancy widow in mourning. It will be easy to use this dress for other occasions by simply changing my accessories or adding an overdress. I could even pull off 'strict' schoolmistress with some spectacles and ruffly white day cap tied under my chin....😂 Upcoming school tours better watch out! LOL!
 |
| Close up of the front. My mourning jewelry is made of silk ribbon with a glass locket containing a miniature portrait of my father. It is attached to my bib with a removable straight pin. |
 |
| And the back view. Pardon my shift peeking out. |
And it's done! Now on to the next project.
Other posts related to this project
Making an early 19th-century mourning dress
Making an early 19th-century mourning dress: The Skirt
Making an early 19th-century mourning dress: Skirt, Bodice, and Bib


No comments:
Post a Comment